
25 Oct 2025
Ragi Powder often known as Ragi Flour might be made simply at dwelling. Home made Ragi Powder is a nutritious, whole-grain flour made by cleansing, rinsing, soaking, sprouting, drying, and grinding finger millet (ragi) at dwelling. It has a lightweight brown colour, a barely nutty aroma, and a gentle earthy style.

Sprouted ragi flour is made by soaking and germinating ragi (finger millet) grains earlier than drying and grinding them. Sprouting enhances the dietary worth, digestibility, and taste of the flour. It’s particularly standard for making child meals, porridges, malt drinks, and rotis resulting from its delicate texture and improved style.
Ragi as it’s popularly identified in Kannada is Finger millet in English, Kezhvaragu or Keppai in Tamil, Ragulu in Telugu, Mandika in Hindi and Nachani in marathi and many others. Home made Ragi Powder is nutritious and is tremendous useful too.
Ragi or Finger Millet could be very nutritious and it’s all the time stated that the diet doubles up when any millet or bean is sprouted. I agree it takes effort and time to make selfmade flours however I inform you, after making I’m certain you’ll really feel content material, comfortable and can by no means look again at retailer purchased flour.
Ragi is an simply digestible millet therefore it’s first began solids for infants. Ragi is superb particularly for teenagers and elders and no marvel its the primary grain launched to infants. Getting ready ragi flour at dwelling ensures it is pure, contemporary, and free from preservatives or components.
Home made Ragi Flour is wealthy in calcium, iron, fiber, and amino acids, making it an amazing selection for infants, youngsters, and adults. It is generally used to organize ragi porridge, dosa, idiyappam, ladoo, malt, and rotis, providing a healthful, gluten-free base for numerous dishes.

Typically there are 2 strategies for making finger millet flour at dwelling :

Extra Ragi Recipes
1.Take ½ kg finger millet in a bowl.

2.Select speck if any. You possibly can even unfold it on a plate and take away. Do in batches.

3.Discard the speck

4.Add water rinse it nicely at the least 2-3 instances.

5.Drain water, discard it.

6.Rinse nicely, drain water till water is evident like this.

7.Drained water is evident.

8.Whenever you see clear water whereas rinsing then you possibly can cease rinsing.

9.Now soak in water.

10.Preserve coated for at the least 8 hrs and even in a single day.

11.Rinse it another time. Then drain water utterly.

12.Add the millet to a sizzling field, unfold it. You possibly can even tie in a material, squeeze extra water and preserve it in a colander. Scorching field makes sprouting sooner.

13.Shut it tightly and put aside undisturbed for a day or at the least for 10 hours. You possibly can even preserve it in muslin material for sprouting.

14.That is the tiny sprout I received after 10 hours. For those who want to get longer sprouts then you possibly can relaxation for another day however be sure the millet doesn’t get spoiled.

15.Unfold it in a plate to a skinny layer in order that it will get dried simply. Solar dry for a day. Make it a skinny layer in any other case it takes time to get dried. It can take simply few hours if the climat could be very sizzling and solar is scorching.

16.Add to kadai and dry roast for five minutes. I did it in 2 batches. You possibly can skip this step and powder it finely after solar drying itself.

17.Unfold it on a plate. Quiet down utterly.

18.Lastly grind it till high-quality. Do it in batches to keep away from heating of mixie which is able to in flip create moisture. However if you want you possibly can sieve ragi flour if the flour could be very coarse. I normally don’t sieve.

19.Unfold it on a plate, then cool utterly later retailer in a clear dry jar.

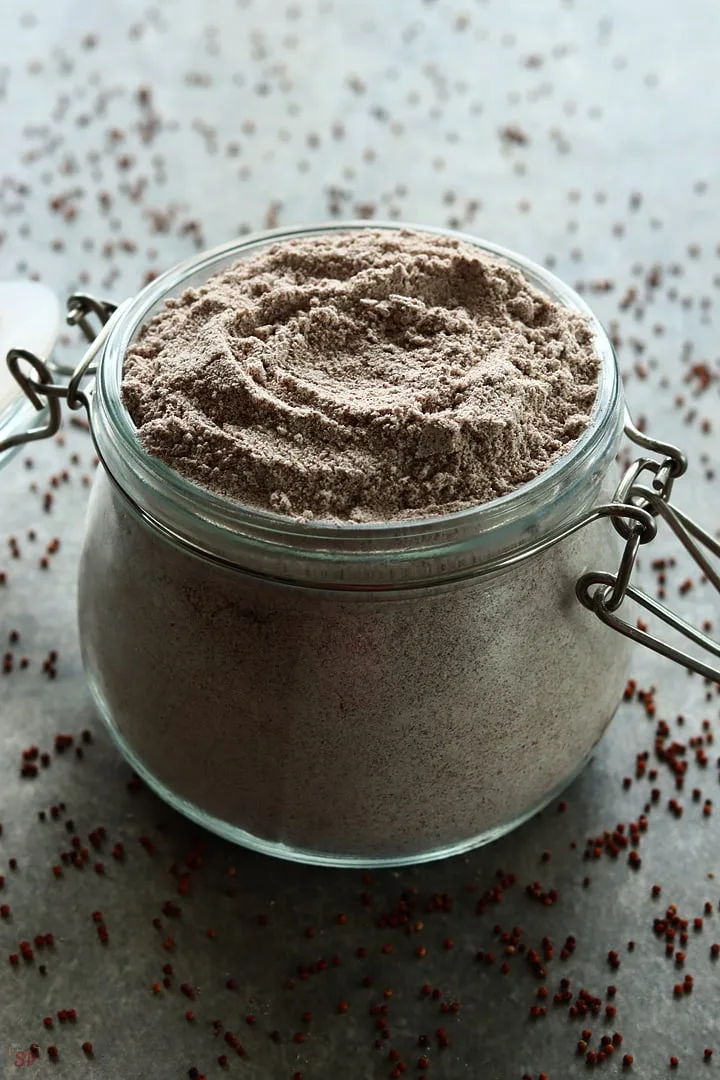
Home made sprouted ragi flour is prepared!
Home made Ragi Powder retains nicely in room temperature for about 3 months. You possibly can lengthen shelf life by storing in fridge, in fridge it retains nicely for a couple of yr additionally.
Sprouting doubles and enhance the dietary worth. Additionally sprouted flour when made right into a powder is straightforward digestible particularly for infants and youngsters.
I simply enable it to sprout simply when it the white stem begins to peep out which is round 10 hours. You possibly can sprout for a day too for longer sprouts.
Sure you possibly can skip sprouting half. Simply rinse the millet drain nicely, sundry it then roast and grind it to a high-quality powder too.
Roasting is elective however advisable. It enhances the aroma, offers a nutty taste, and helps forestall spoilage. For child meals, you possibly can skip roasting to retain extra vitamins.

When you’ve got any extra questions on this Ragi Flour Recipe do mail me at sharmispassions@gmail.com
As well as, comply with me on Instagram, Fb, Pinterest ,Youtube and Twitter .
Tried this Ragi Flour Recipe? Do let me understand how you preferred it. Additionally tag us on Instagram @sharmispassions and hash tag it on #sharmispassions.
Ragi Powder often known as Ragi Flour might be made simply at dwelling. Home made Ragi Flour or Ragi Powder is a nutritious, whole-grain flour made by cleansing, drying, and grinding finger millet (ragi) at dwelling. It has a lightweight brown colour, a barely nutty aroma, and a gentle earthy style.
Take ½ kg finger millet in a bowl.
Select speck if any. You possibly can even unfold it on a plate and take away. Do in batches.
Discard the speck.
Add water rinse it nicely.
Drain water, discard it. Rinse nicely, drain water till water is evident.
Whenever you see clear water whereas rinsing then you possibly can cease rinsing.
Now soak in water.
Preserve coated for atleast 8 hrs and even in a single day.
Rinse it another time. Then drain water utterly.
Add the millet to a sizzling field, unfold it. You possibly can even tie in a material, squeeze extra water and preserve it in a colander. Scorching field makes sprouting sooner.
Shut it tightly and put aside undisturbed for a day or atleast for 10 hours.
That is the tiny sprout I received after 10 hours. For those who want to get longer sprouts then you possibly can relaxation for another day however be sure the millet doesn’t get spoiled.
Unfold it in a plate to a skinny layer in order that it will get dried simply. Solar dry for a day or two. Make it a skinny layer in any other case it takes time to get dried.
Add to kadai and dry roast for 3-5 minutes. I did it in 2 batches.
Unfold it on a plate. Quiet down utterly.
Lastly powder it till high-quality.Do it in batches to keep away from heating of mixie which is able to in flip create moisture. I would not suggest sieving. However if you want you possibly can sieve it if the flour could be very coarse.
Unfold it on a plate, cool utterly then retailer in a clear dry jar.
Home made ragi flour prepared!
Diet Details
Ragi Powder | Ragi Flour | Ragi Recipes
Quantity Per Serving (125 g)
Energy 820
Energy from Fats 27
% Day by day Worth*
Fats 3g5%
Saturated Fats 1g6%
Polyunsaturated Fats 1g
Monounsaturated Fats 2g
Sodium 28mg1%
Potassium 1020mg29%
Carbohydrates 180g60%
Protein 18g36%
Calcium 860mg86%
Iron 10mg56%
* P.c Day by day Values are primarily based on a 2000 calorie food plan.
Subscribe to get the latest posts sent to your email.

Leave a Reply